CSS quick start
intro to CSS
CSS stands for Cascading Style Sheets - In css you can determine what the content of a webpage looks like.
your CSS code has to go in between style tags. the style tag should have an attribute type with the value "text/css", to tell it that we're using css. Within these style tags, we can style things by putting the name of what we want to style in front of curly brackets, and putting our styles inside of the curly brackets.
<style type="text/css">
strong{
color: #eeeeee;
}
notice how we have strong in front of the curly brackets. this tells us that we're changing the way the strong tag affects the text. Inside of the curly brackets, we list our css properties in the following syntax
property: value;
in the earlier example the property was color and the value is a color expressed in a hex format.
please note: if you ever try to style something and your changes are not displaying check that you included the colon(:) after the property and the semicolon(;) after the value. (I've made this mistake countless times)
adding CSS to your page
you may be wondering, where does this style tag go in an HTML page? it goes in the head section. Here is an example;
<!DOCTYPE html>
<html>
   <head>
   <title>My Website</title>
   <style type="text/css">
      strong{
      color: #eeeeee;
    </head>
    <body>
      <h1>welcome to my website</h1>
      <p> thanks for <strong>visiting</strong><p>
    </body>
</html>
Alternatively
You can also put your css in a different file and within the head of your html link to it. In this way it may be easier to keep your documents orderly and readable. To do so;
<html>
   <head>
   <title>My Website</title>
    <link rel="stylesheet" href="style.css" type="text/css"/>
    </head>
    <body>
      <h1>welcome to my website</h1>
      <p> thanks for <strong>visiting</strong><p>
    </body>
</html>
in this example the rel attribute defines a relationship between the linked source, and the current document. The href refers to the document where the css should be written. The type attribute with the value "text/css" tells us the content of the referred file contains CSS.
Changing your fonts
the CSS property used to change the font on your page is called font-family you can give it the name of a font in quotes, for example;
body{
   font-family: 'Arial';
}
And it will use that font if it’s on the computer of whoever is visiting your website. You can also give it a type of font (a generic family of fonts):
body{
   font-family: sans-serif;
}
and the browser will use a font in that family. some font families you can use are;
- serif
- sans-serif
- cursive
- monospace
You can also give the font-family property a list of fonts separated by commas. When you do this it will try every font down the list. If the browser doesn't have the first font, it will move on to the next one. for example;
body{
   font-family: 'Courier New', monospace;
}
- Font size another property to use when you want to change the size of your font is called font-size. for example, if you want a 12pt font;
body{
   font-size: 12pt;
}
Classes and IDs
Classes and id's are what we call selectors. They allow us to select specific elements and apply the css styles.
An id allows you to identify a single element in the HTML and apply a particular style to it. Each element can have only one ID and each page can have only one element with that specific ID. in CSS the ID selector is preceded by a #
#example {
background-color: blue;
}
In the example above, an object identified as #example is styled with a blue background color.
a class is used if you need to use the same selector more than once within a page or a site. While an ID is specific to a single element, classes can be assigned to multiple elements on a page or throughout the website. They are not unique. And while a single element can only have one ID, it can have multiple classes. In CSS the class selector is preceded by a .
.example2 {
background-color: red;
}
In the example above, one or multiple objects within the same class are styled with a red background color.
Margin and Padding

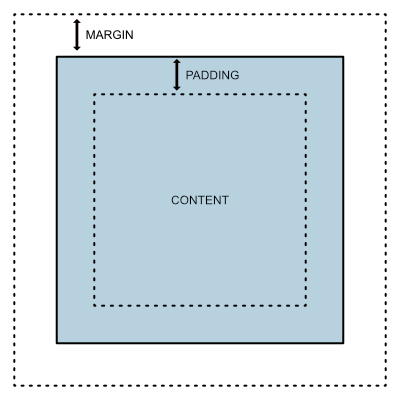
Margins, and padding are essential tools for controlling the spacing around and within elements on a webpage.
Imagine every element on your website (a heading, a paragraph, an image) residing inside a box. This box consists of several layers:
- Content The actual text, image or video.
- Padding The space between the content and the element’s border.
- Border The line that outlines an element (can be invisible).
- Margin The space outside of the element’s border, separating it from other elements.